Skip to content
DisclaimerTerms Of UseGDPR PolicyCookie Policy

greenmealmap

  • Home
  • Drinks
  • Appetizers
  • Dinner
  • Dessert
  • About
  • Contact
  • Privacy Policy
DisclaimerTerms Of UseGDPR PolicyCookie Policy

Lauren

- 2 lbs chicken wings - 1/4 cup soy sauce - 1/4 cup honey - 2 tablespoons rice vinegar To start, you need fresh chicken wings. I love using about 2 pounds. The key flavors come from soy sauce and honey. You will mix these in equal parts, each at 1/4 cup. Rice vinegar adds a nice tang. Just 2 tablespoons will do. - 2 tablespoons sesame oil - 3 cloves garlic, minced - 1 teaspoon fresh ginger, grated - 1 teaspoon ground black pepper Next, let’s boost the flavor. Add 2 tablespoons of sesame oil. It gives a nutty taste. Use 3 cloves of minced garlic and 1 teaspoon of freshly grated ginger. They both add depth. Don’t forget the black pepper; 1 teaspoon will add a little heat. - 1 tablespoon cornstarch - 2 green onions, chopped (for garnish) - Sesame seeds (for garnish) For garnish, you’ll need 1 tablespoon of cornstarch. This will thicken the glaze. Top the wings with fresh green onions, about 2 chopped. Finally, sprinkle some sesame seeds for crunch. This simple list of ingredients makes the wings truly special. If you want the full recipe, check the earlier section. 1. Prep the Wings: Start by drying the chicken wings with paper towels. This step helps the skin get crispy when cooked. 2. Make the Marinade: In a large bowl, whisk together the soy sauce, honey, rice vinegar, sesame oil, minced garlic, grated ginger, and ground pepper. Mix it well until combined. 3. Marinate the Chicken: Add the wings to the marinade and toss them to coat well. Cover the bowl with plastic wrap and refrigerate for at least one hour. Overnight is even better for more flavor. 4. Preheat the Oven: When you’re ready to cook, preheat your oven to 425°F (220°C). Line a baking sheet with parchment paper for easy cleanup. 5. Bake the Wings: Remove the wings from the marinade, but keep the marinade for later. Pat the wings lightly to remove excess marinade. Place them on the baking sheet in a single layer. Bake for 30-35 minutes, turning them halfway through, until they are crispy and cooked through. 6. Create a Glaze: While the wings bake, pour the reserved marinade into a saucepan and bring it to a boil. Lower the heat and let it simmer for 5-7 minutes. Mix cornstarch with a tablespoon of water to make a slurry, then add it to the simmering sauce to thicken. 7. Glaze the Wings: Once the wings are done, take them out of the oven. Brush the thickened glaze on the wings or toss them in a bowl with the glaze for an even coat. 8. Garnish and Serve: Transfer the glazed wings to a serving platter. Garnish with chopped green onions and sesame seeds for a finished look. For the full recipe, check out the details above! To get that perfect crunch, dry the wings well. Pat them with paper towels before marinating. This helps remove moisture and makes the skin crispier when cooked. When baking, place the wings in a single layer on the baking sheet. This allows hot air to circulate around each wing, helping them to cook evenly. Add fresh herbs like cilantro or green onions for a burst of flavor. You can also try spices, like cayenne pepper, to give a kick. If you like it sweeter, add more honey. For some heat, throw in a bit of chili paste. Adjust these to your taste for the best result. You can grill or bake the wings. Grilling gives a smoky flavor, while baking is easy and mess-free. If you choose to use an air fryer, it cuts down cooking time. Set it to 400°F (200°C) and cook for about 25 minutes. This will give you crispy wings in no time! For the full recipe, check out the steps above for more delicious details! {{image_2}} You can easily change the taste of honey soy glazed chicken wings. Here are two fun ideas: - Spicy Honey Soy: If you like heat, mix in chili paste or red pepper flakes. This will give your wings a nice kick. - Citrus Honey Soy: For a fresh twist, add orange or lemon juice to the marinade. This brightens the flavor and adds zest. You can also make these wings fit different diets: - Gluten-free soy sauce alternatives: Use tamari or coconut aminos instead of regular soy sauce. This keeps the flavor while making it gluten-free. - Vegan protein substitutes: Try using tofu or cauliflower instead of chicken. Both soak up the marinade well and taste great. Pair your wings with tasty sides and dips for a full meal: - Dipping sauces: Serve with ranch or blue cheese for a creamy treat. These dips balance the sweet and savory flavors of the wings. - Sides: Coleslaw or potato wedges make great accompaniments. They add crunch and comfort to your plate. For the full recipe, check out the Honey Soy Glazed Chicken Wings section above. To keep your honey soy glazed chicken wings fresh, place them in an airtight container. This will stop air from making them dry. Store the wings in the fridge for up to four days. Always let them cool before sealing. If you have extra wings, freezing them is easy. First, let the wings cool completely. Then, place them in a freezer-safe bag. Try to remove as much air as you can. You can freeze them for up to three months. When you want to eat them, thaw in the fridge overnight. Reheat in the oven at 350°F (175°C) until warm. Watch for signs of spoilage like a bad smell or slimy texture. If the wings look odd, do not eat them. Cooked chicken wings should reach an internal temperature of 165°F (74°C) for safe eating. Enjoy your meal, knowing it’s safe and tasty! For the full recipe, check out the complete guide. For the best flavor, marinate the chicken wings for at least one hour. If you can, let them sit overnight. This extra time allows the wings to soak up all that yummy honey and soy taste. It makes a big difference in how they turn out. Yes, you can use other cuts of chicken! Chicken thighs or drumsticks work well too. Just remember that cooking times may change. Make sure to check that all parts are fully cooked. If you want a vegan option, use maple syrup. It has a nice sweetness. For a sugar-free choice, try agave syrup. Both will give you great flavor without using honey. Chicken wings should reach an internal temperature of 165°F or 74°C. Use a meat thermometer to check. This ensures your wings are safe to eat. This guide showed you how to make delicious chicken wings using simple steps. We covered ingredients, cooking methods, and storage tips to help you enjoy them anytime. Remember, drying the wings adds crispiness, and marinating brings out great flavors. Feel free to experiment with spices or sauces to match your taste. With the right tips, you can serve tasty wings perfect for any occasion. Enjoy your cooking and happy eating!

Honey Soy Glazed Chicken Wings Tempting and Flavorful

If you’re craving a dish that’s both sweet and savory, you’ve found it! My Honey Soy Glazed Chicken Wings will

To make Zucchini Parmesan Crisps, you need just a few simple ingredients. Here’s what you'll need: - 2 medium zucchinis - 1 cup grated Parmesan cheese - 1 cup panko breadcrumbs - 1 teaspoon garlic powder - 1 teaspoon onion powder - 1 teaspoon Italian seasoning - Salt and pepper to taste - Olive oil spray Using fresh zucchinis makes a big difference. Look for ones that are firm and shiny. The Parmesan cheese gives a rich flavor, while panko breadcrumbs create that perfect crunch. For the spices, garlic powder and onion powder add warmth. Italian seasoning brings all those great flavors together. Don't forget to season with salt and pepper! When you have everything ready, you're set to create a delicious snack. For the full recipe, follow the steps ahead and enjoy your crunchy treats! First, you need to preheat your oven to 425°F (220°C). This step helps your crisps turn out golden and crunchy. Next, line a baking sheet with parchment paper. This makes cleanup easy and keeps the crisps from sticking. For slicing the zucchinis, aim for thin rounds about 1/4 inch thick. Use a sharp knife for clean cuts. If the slices are too thick, they won't crisp well. Pat the slices dry with paper towels. This step helps remove excess moisture, leading to a better crunch. In a large bowl, mix the grated Parmesan cheese, breadcrumbs, garlic powder, onion powder, and Italian seasoning together. Add salt and pepper to your taste. Stir well until everything is fully mixed. This blend is key for flavor and helps the zucchini crisps taste amazing. Take each zucchini slice and coat it in the cheese mixture. Press lightly to make sure the coating sticks. Lay the coated slices on the baking sheet in a single layer. Make sure to leave some space between each slice. This helps them crisp up evenly during baking. Bake the zucchini crisps in your preheated oven for about 20-25 minutes. Keep an eye on them. You want them golden brown and crispy. Halfway through baking, flip the slices for even cooking. This step is crucial for that perfect crunch. Following these steps will lead you to delicious Zucchini Parmesan Crisps. For the full recipe, check the earlier section. Enjoy your tasty snack! To get the best crunch, use fresh zucchinis. Slice them thin, about 1/4 inch thick. Patting them dry is key. Moisture will make them soft. After you slice the zucchinis, use paper towels to soak up extra water. This step is crucial for crispy results. For dips, marinara sauce works perfectly. It adds a nice flavor. You can also try ranch or a yogurt dip. To impress guests, serve the crisps on a colorful platter. Add fresh basil leaves for a pop of color. It makes your dish look fancy. You can change the cheese for a new taste. Try mozzarella or cheddar for something different. Adding spices like paprika or cumin can also spice things up. If you want to cook differently, use an air fryer. It will give you a nice crunch with less oil. A skillet works too; just watch the heat to avoid burning. For the full recipe, check out the ingredients and steps I provided earlier. {{image_2}} You can make Zucchini Parmesan Crisps even more tasty with some spices or herbs. Try adding paprika for a bit of heat. A pinch of cayenne can boost the flavor too. If you like fresh herbs, toss in some chopped basil or oregano. These additions bring new life to each bite. You can also change the cheese to switch things up. While Parmesan is great, try using Pecorino Romano for a saltier kick. Mozzarella gives a gooey texture that pairs well with the crispiness. Experimenting with cheese lets you find your favorite taste. If you need a gluten-free option, you can swap breadcrumbs. Use ground almonds or crushed cornflakes. Both work well and keep the crispiness. Just ensure the substitute is certified gluten-free. For a vegan version, use plant-based cheese. Brands offer styles that melt well and taste great. Nutritional yeast is another option that adds a cheesy flavor without dairy. You can also skip the cheese entirely and focus on herbs and spices for a bold flavor. To keep your Zucchini Parmesan Crisps fresh, place them in an airtight container. Use a container that fits the crisps without stacking them too high. This helps avoid moisture buildup. Store in the fridge for up to three days. If you notice any moisture, lay a paper towel inside the container. This will absorb extra moisture and keep them crisp. To reheat your crisps while keeping them crunchy, use the oven. Preheat your oven to 375°F (190°C). Spread the crisps on a baking sheet in a single layer. Heat for about 10 minutes. Check them often to avoid burning. This method restores their crunch without making them soggy. Avoid using the microwave, as it makes them soft. Zucchini Parmesan Crisps can stay fresh for about 3 days in the fridge. Store them in an airtight container to keep them dry. If you want to keep them longer, you can freeze them. Frozen crisps last up to 2 months. Just remember to let them cool completely before freezing. Yes, you can make these crisps ahead of time. Prepare the zucchini and coat them in the cheese mixture. You can store them in the fridge for a few hours before baking. This way, they stay fresh and tasty. Bake them just before serving for the best crunch. If your crisps aren’t crispy, check a few things. First, make sure you sliced the zucchini thinly. Thick slices hold more moisture. Next, pat them dry before coating. This step helps reduce sogginess. Also, ensure you bake them long enough and flip them halfway through cooking. Absolutely! You can use other veggies like eggplant or squash. They work well with the same coating. Just slice them thin and follow the same steps. You can even mix different veggies for a fun twist! This post covered how to make Zucchini Parmesan Crisps. We looked at ingredients, step-by-step instructions, and tips for perfecting the dish. You learned how to mix, coat, and bake zucchini for a crunchy snack. We also explored variations and storage advice. In the end, these crisps are fun to make and delicious to eat. Enjoy experimenting with flavors and serving ideas! Your kitchen will never be the same once you try this recipe.

Zucchini Parmesan Crisps Crunchy and Easy Snack Recipe

Are you ready to crunch your way to a healthier snack? Zucchini Parmesan Crisps are easy to make, tasty, and

Start with three ripe avocados. Ripe avocados are soft to the touch but not mushy. They should feel slightly yielding when you press gently. This is key for a creamy base with some texture. You’ll need a few fresh veggies to add flavor. Grab one small red onion, finely chopped. A medium tomato, diced, adds sweetness and color. For a kick, use one jalapeño pepper, minced. Adjust the heat to your taste. If you like garlic, add one clove, minced. Use two tablespoons of fresh lime juice for zing. Lime juice keeps the guacamole green and bright! Add 1/4 cup of fresh cilantro, chopped, for a fresh herb taste. Finally, sprinkle with salt and pepper to taste to enhance all the flavors. For the full recipe, check out Homemade Chunky Guacamole. Enjoy making this fresh and flavorful delight! First, choose three ripe avocados. A ripe avocado should feel slightly soft when pressed. Cut each avocado in half and remove the pit. Use a spoon to scoop the green flesh into a mixing bowl. This is where the magic begins. Next, grab a fork or a potato masher. Gently mash the avocados. You want to leave some chunks for texture. Now, add the finely chopped red onion, diced tomato, and minced jalapeño pepper. If you love garlic, you can also add a clove of minced garlic. This will give your guacamole extra flavor. Drizzle two tablespoons of fresh lime juice over the mixture. This adds a bright flavor and helps keep the guacamole green. Sprinkle salt and pepper to taste, then toss in 1/4 cup of chopped cilantro. Gently fold all the ingredients together. Be careful not to over-mash; you want it chunky. Taste your guacamole and adjust seasonings as needed. More lime juice or salt can enhance the flavor. For the full recipe, check the details above. To make your guacamole chunky, don’t over-mash the avocados. I suggest using a fork or potato masher. Start by mashing only half of the avocado. Leave the rest in bigger pieces. This gives a nice bite to your guacamole. Once you mix in the onion, tomato, and jalapeño, the texture will become even better. Remember, chunky is the goal! Need ripe avocados fast? Place them in a paper bag. Add an apple or banana to the bag. The ethylene gas from these fruits helps avocados ripen quickly. Check them after a day. If they feel soft, they are ready to use. If they aren’t ripe yet, leave them for another day. This trick really works! When slicing avocados, use a sharp knife. Cut the avocado in half and twist to separate the sides. Carefully remove the pit with a spoon. For dicing, make cuts in the flesh without breaking the skin. Then scoop it out with a spoon. This method helps keep the pieces even and neat. It makes mixing them into the guacamole easy and quick. For the full recipe, check out the Homemade Chunky Guacamole section. {{image_2}} To spice up your guacamole, add more jalapeño. Adjust the amount based on your heat level. You can also try adding diced serrano peppers for extra kick. If you like smoky flavors, toss in some chipotle in adobo sauce. This will give your guacamole a deep, rich taste. Fruits make guacamole fun and fresh. Try adding diced mango or pineapple for sweetness. They pair well with the creamy avocado. You can also add pomegranate seeds for a crunchy texture. Other vegetables, like corn or bell peppers, add color and flavor too. Just chop them small to keep the chunky vibe. For a lighter version, consider using Greek yogurt instead of some avocado. This keeps it creamy but cuts calories. You can also add more veggies like diced cucumbers or zucchini. They add crunch and make your guacamole even more nutritious. Finally, try using lime zest for added flavor without added calories. For the full recipe, check out Homemade Chunky Guacamole. To keep guacamole fresh, first cover it tightly. Air makes it brown quickly. Use plastic wrap, pressing it directly onto the surface. This reduces air contact. Alternatively, store it in an airtight container. Adding a thin layer of lime juice on top also helps. This gives it a zesty flavor and keeps it vibrant. You can freeze homemade chunky guacamole for later use. First, ensure it’s well mixed but still chunky. Spoon it into a freezer-safe bag or container. Remove as much air as possible to avoid freezer burn. It can last up to three months. When ready to use, thaw it overnight in the fridge. Stir it gently after thawing for best results. For short-term storage, use glass or plastic containers with tight lids. These keep the guacamole fresh longer. For freezing, choose heavy-duty freezer bags or containers. Label the containers with the date. This way, you know when to use them. Always keep guacamole away from strong odors, as it can absorb them. For more tips, check the Full Recipe for perfect storage ideas. You can serve chunky guacamole with many tasty items. Tortilla chips are a classic choice. They add a nice crunch and pair well with the creamy guacamole. You might also try fresh veggies like carrots, cucumbers, or bell peppers for a healthy twist. If you want something heartier, serve it with quesadillas, tacos, or burritos. Guacamole also goes great on sandwiches and burgers. The options are endless, so feel free to get creative! If your guacamole is too runny, don't worry; there are easy fixes. First, you can add more avocado. Simply mash another half avocado and mix it in. This helps thicken the texture. You can also add finely chopped vegetables like onion or tomato. These will soak up some moisture and add flavor. If you want more spice, consider adding more jalapeño. Just be careful not to overdo it. Keep tasting as you adjust! You can make guacamole ahead of time, but it’s best fresh. If you need to prepare it early, store it in an airtight container. Press plastic wrap directly onto the surface of the guacamole to limit air exposure. This helps slow down browning. If it does brown, you can stir it before serving. Just remember, it tastes best when fresh! For the full recipe, check the detailed instructions above. In this blog post, we explored how to make a tasty chunky guacamole. We covered key ingredients like ripe avocados, fresh veggies, and the right seasonings. I also shared steps for preparing avocados and tips for that perfect chunkiness. Remember, you can add your twist with variations or use healthy swaps. Lastly, proper storage helps keep guacamole fresh. Enjoy your guacamole with chips, veggies, or as a topping. You’re now ready to impress your friends with your new skills!

Homemade Chunky Guacamole Fresh and Flavorful Delight

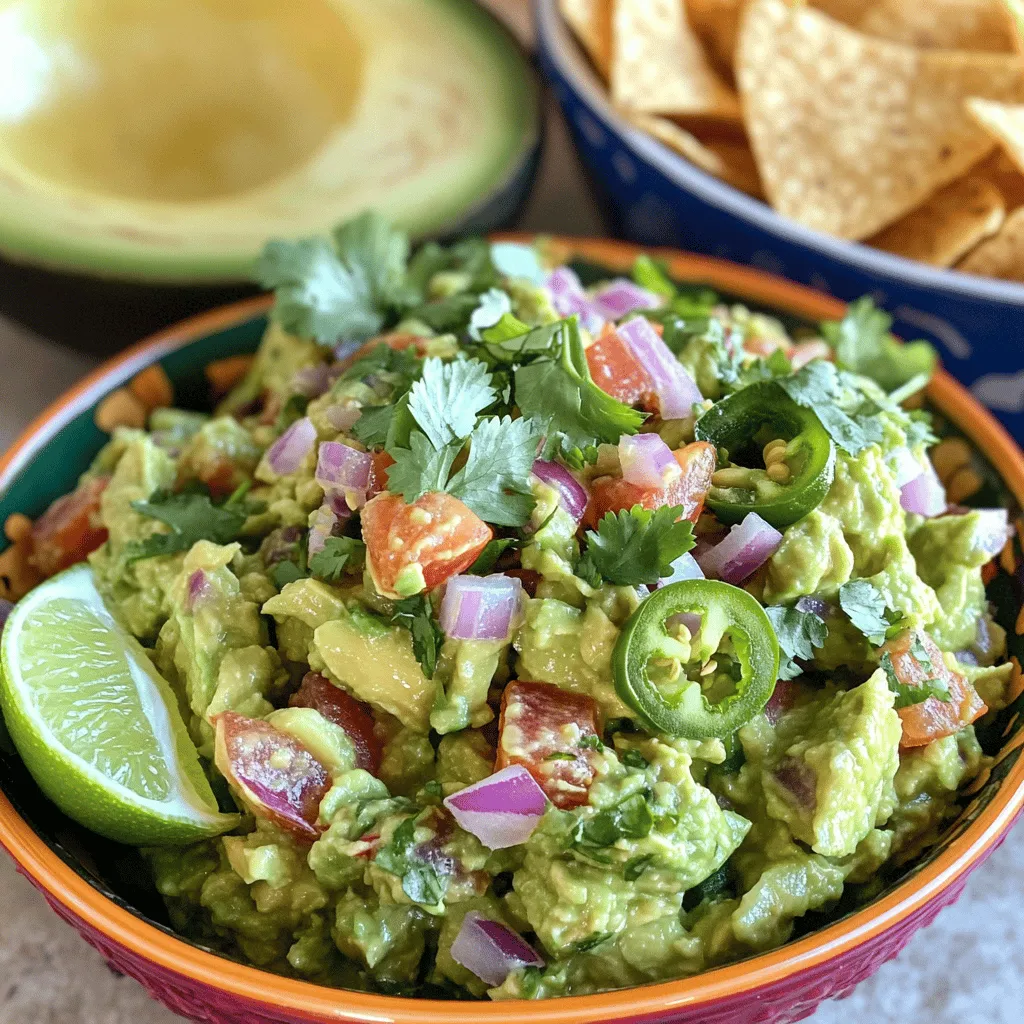
Are you ready to make the best homemade chunky guacamole? This fresh and flavorful delight will impress your friends and

- 1 pound fresh asparagus, trimmed - 3 tablespoons olive oil - 4 cloves garlic, minced - Zest of 1 large lemon - 2 tablespoons fresh lemon juice - Salt and freshly cracked black pepper, to taste - 1/4 teaspoon red pepper flakes (optional) - Lemon wedges for garnish To make Lemon Garlic Roasted Asparagus, you need fresh asparagus. Look for bright green stalks. Trim the woody ends for the best bite. You will also need olive oil, which adds richness. Garlic gives the dish a wonderful aroma. The zest and juice of a lemon brighten the flavors. For seasoning, add salt and black pepper. This brings the taste alive. If you want a kick, use red pepper flakes. They add a nice heat. Lemon wedges are perfect for serving. They make the dish look nice and add more flavor. This simple list of ingredients makes a tasty side dish. You can enjoy it with any meal. For the full recipe, check out the detailed steps on how to prepare this delicious dish. - Preheating the oven Preheat your oven to 425°F (220°C). This heat gives the asparagus a nice roast. - Preparing the asparagus Trim the tough ends off the asparagus. This helps them cook evenly and taste great. - Mixing the ingredients In a large bowl, mix the trimmed asparagus, olive oil, minced garlic, lemon zest, and lemon juice. Don’t forget to sprinkle in salt and pepper. Toss until every piece is coated. - Roasting time and techniques Spread the asparagus on a baking sheet. Make sure they are in a single layer. Roast for 12-15 minutes. You want them tender but still a bit crisp. - Adding lemon juice and zest after roasting When you take them out, drizzle a little extra lemon juice on top. Add a sprinkle of lemon zest for more flavor. - Plating and serving suggestions Place the roasted asparagus on a serving platter. Garnish with lemon wedges on the side. This adds a nice touch that looks great. For the full recipe, check out [Full Recipe]. To select fresh asparagus, look for bright green stalks. The tips should be tightly closed and firm. Avoid any that are wilted or have brown spots. Spacing on the baking sheet is key. Lay the asparagus in a single layer. This allows even heat to reach each piece. Crowding the pan can lead to steaming instead of roasting. You can add herbs or spices for extra flavor. Try thyme, rosemary, or parsley to mix things up. A pinch of garlic powder or onion powder can also give a nice kick. Using flavored oils can change the dish’s taste. Consider using garlic-infused olive oil or lemon oil. These options add depth without extra work. For the full recipe, check out the detailed instructions earlier in the article. {{image_2}} You can switch up the vegetables in this dish. Try roasting broccoli, Brussels sprouts, or green beans. Each veggie brings its own flavor. Mix and match for fun! You can also swap lemon for other citrus. Lime or orange juice works great. Each adds a unique twist while keeping the dish bright and fresh. This recipe is easy to make vegan. Just use vegetable oil instead of olive oil. It’s also gluten-free, which is perfect for those with dietary needs. If you want to cut down on sodium, simply skip the salt. The garlic and lemon give plenty of flavor. You can adjust the red pepper flakes too. This keeps the dish delicious while meeting your health goals. For the Full Recipe, click here to find all the details. To keep your lemon garlic roasted asparagus fresh, place it in an airtight container. This helps to keep moisture out. Store the container in the fridge for up to three days. If you want to reheat, use the oven. Preheat it to 350°F (175°C) and bake for about 10 minutes. This keeps the asparagus crisp. When stored properly, lemon garlic roasted asparagus stays fresh for up to three days. After that, it may lose its taste and texture. Look for signs of spoilage like a slimy texture or browning tips. If you notice these, it's best to toss the asparagus. Freshness is key for the best flavor! Lemon garlic roasted asparagus pairs well with many dishes. Try it with grilled chicken or fish. It also goes nicely with pasta or quinoa. For a heartier meal, serve it alongside steak or pork chops. You can even include it in a salad for added crunch and flavor. Yes, you can use frozen asparagus. Thaw it first to ensure even cooking. Pat it dry to remove excess moisture. This helps it roast better and prevents sogginess. Cooking time may change, so check it after 10 minutes. Frozen asparagus may need a bit more time, but it can be just as tasty. Yes, this recipe is great for meal prep. You can roast the asparagus in advance and store it. Allow it to cool before placing it in an airtight container. It will stay fresh in the fridge for up to three days. Reheat it in the oven or microwave for a quick side dish. For the best taste, add fresh lemon juice before serving. You can find the full recipe [here](#). Lemon Garlic Roasted Asparagus is simple and tasty. You learned the key ingredients, steps, and tips. Fresh asparagus shines with lemon and garlic. Try different veggies and seasonings to mix things up. Store leftovers properly for later enjoyment. This dish works well with many meals and is great for meal prep. Enjoy this easy and delicious recipe.

Lemon Garlic Roasted Asparagus Healthy Easy Side Dish

Are you ready to make a side dish that dazzles? Lemon Garlic Roasted Asparagus is simple, healthy, and packed with

- Chicken breasts - Buffalo sauce - Lettuce leaves For my Buffalo Chicken Lettuce Wraps, I start with chicken breasts. They are lean and cook quickly. Then, I add buffalo sauce. This gives the wraps that spicy kick we all love. Lastly, I use lettuce leaves. Romaine or butter lettuce works best. They provide a crisp texture and hold all the filling well. - Shredded carrots - Diced celery - Blue cheese crumbles I like to add shredded carrots for some crunch. Diced celery also gives a nice texture. Blue cheese crumbles are optional, but they add a creamy taste that balances the heat. Feel free to mix and match any toppings you enjoy. - Garlic powder - Onion powder - Salt and pepper Seasoning is key to flavor. I use garlic powder and onion powder for depth. A pinch of salt and pepper brings out the best in the chicken. These simple ingredients make a big difference in taste. For the full recipe, check out the details to create this easy and tasty meal. First, heat one tablespoon of olive oil in a large skillet over medium heat. You want the oil to shimmer, which shows it is ready. Next, add one pound of diced chicken breasts to the skillet. Season the chicken with one teaspoon of garlic powder, one teaspoon of onion powder, salt, and pepper to taste. Stir well to ensure the chicken is coated evenly with the spices. This step adds great flavor to your dish. Cook the chicken for about 6-8 minutes. It should be fully cooked and no longer pink. You can check by cutting a piece; it should look white inside. Once cooked, pour in ½ cup of buffalo sauce. Stir well to mix the sauce with the chicken. Let it heat for 2-3 minutes. This makes the sauce thicken and cling to the chicken. While the chicken cooks, wash and dry 8 large romaine or butter lettuce leaves. These leaves will be your wraps. To serve, take a lettuce leaf and spoon some buffalo chicken mixture into the center. Top with ½ cup of shredded carrots, ½ cup of diced celery, and optional blue cheese crumbles. Finish by garnishing with fresh cilantro or parsley for an extra burst of flavor. Enjoy your tasty meal! For the complete steps, check the Full Recipe. To make these wraps lighter, consider using low-sodium buffalo sauce. This choice cuts back on salt while keeping great flavor. You can also swap chicken for turkey or tofu. Both options offer a tasty twist while reducing fat. Turkey has lean protein, and tofu is plant-based, making it great for everyone. You can easily control the heat in your buffalo chicken. Start with less buffalo sauce if you prefer a milder taste. You can add more sauce later as needed. If you want a different flavor, try using barbecue sauce or a honey mustard mix. These options give a unique spin to your wraps. Pair your buffalo chicken lettuce wraps with fresh veggies. Crunchy carrots, cucumbers, or a side salad work well. They add color and texture. For drinks, try pairing your meal with a light beer, sparkling water, or iced tea. These choices refresh your palate and balance the heat. For the complete preparation details, check the Full Recipe. {{image_2}} You can swap chicken with turkey or shrimp. Turkey gives a leaner option. Shrimp cooks fast and adds great flavor. For vegetarian or vegan choices, use chickpeas or tofu. Both options soak up flavors well. You can toss them in the buffalo sauce just like the chicken. To make the wraps even better, add avocado or jalapeños. Avocado adds creaminess that balances heat. Jalapeños bring a fresh kick. You can also mix spices like cayenne or smoked paprika for depth. These small changes can change the whole dish. Try different lettuce types for your wraps. Butter lettuce is soft and easy to fold. Romaine adds a nice crunch. You can also use tortillas or pita bread instead. These options give you a fun twist. They change the texture and make it exciting. For the full recipe and more ideas, check out the [Full Recipe]. Store your Buffalo Chicken Lettuce Wraps in airtight containers. This keeps them fresh and safe. I recommend using glass or plastic containers with tight seals. The wraps last about 3 to 4 days in the fridge. If you notice any signs of spoilage, like weird smells or colors, throw them away. You can freeze these wraps for later. To do this, wrap each one tightly in plastic wrap. Then, place them in a freezer-safe bag or container. They can last up to 2 months in the freezer. When you're ready to eat, take out a wrap and let it thaw in the fridge overnight. Reheat it in the microwave for about 1 to 2 minutes until warm. Prep is key for a quick meal! You can chop the chicken and veggies in advance. Store them in separate containers in the fridge. When it's time to eat, just cook the chicken and assemble the wraps. This saves time and makes your meal easy. You can also make the chicken mix ahead and keep it in the fridge. Just fill the lettuce wraps when you’re ready to serve. Enjoy your meal! Yes, you can make these wraps ahead. I suggest cooking the chicken and storing it. Keep the chicken in an airtight container in the fridge for up to three days. You can wash and dry the lettuce leaves in advance too. Just keep them covered in the fridge. Assemble the wraps just before serving for the best crunch. You have many tasty options! Here are some ideas: - Fresh veggie sticks like carrots and cucumbers - A light salad with a tangy dressing - Sweet potato fries for a warm side - Cold beverages like iced tea or lemonade These sides balance the spicy wraps well. To kick up the heat, try these tips: - Use extra buffalo sauce, but taste as you go. - Add sliced jalapeños for a fresh heat. - Mix in some hot sauce with the buffalo sauce. - Serve with a spicy dip on the side. These options let you control the spice level perfectly. For the complete preparation details, check out the Full Recipe. It provides step-by-step instructions and tips to ensure your wraps are a hit! Buffalo chicken lettuce wraps are a fun and tasty dish. We explored key ingredients, cooking steps, and tips to make them your own. Remember to experiment with flavors and textures for a unique taste. You can even meal prep or adjust heat levels to suit your taste. This dish works well with various sides and drinks too. Enjoy these wraps tonight for a satisfying and healthy meal!

Buffalo Chicken Lettuce Wraps Flavorful and Easy Meal

Craving a meal that’s full of flavor but easy to make? Look no further! Buffalo Chicken Lettuce Wraps are your

- 1 cup strawberries, hulled and sliced - 1 ripe banana, peeled - 1/2 cup rolled oats - 1 cup almond milk (or any milk of your choice) - 1 tablespoon honey or maple syrup - 1/2 teaspoon vanilla extract - 1/4 teaspoon ground cinnamon - Ice cubes (for a colder smoothie) How to properly measure fruits and oats: Use a dry measuring cup for oats. For fruits, use a liquid measuring cup. This ensures accuracy. Suggested measurements for varying servings: For one serving, use half of the main ingredients. For three servings, simply multiply everything by 1.5. This way, you can easily adjust the recipe based on your needs and how many you're serving. If you're curious about the full recipe, check out the Berrylicious Banana Oat Smoothie. First, gather your ingredients. You need fresh strawberries and a ripe banana. Start by hulling and slicing the strawberries. Then, peel the banana and break it into chunks. This makes it easier to blend. Next, you will add all these ingredients to your blender. For the best results, use a high-speed blender. Start blending at a low speed to mix the fruits. Gradually increase the speed to high. This helps create a creamy texture. Blend until everything is smooth and well combined. If it seems too thick, add more almond milk. You can also throw in a few ice cubes for a colder drink. Once your smoothie is ready, pour it into two glasses. You can enjoy it right away. For a fun touch, consider garnishing. Add a few fresh strawberry slices on top or sprinkle some rolled oats. This adds texture and makes your smoothie look great. To make your smoothie just right, start with sweetness. You can adjust it easily. If you want it sweeter, add more honey or maple syrup. Blend again and taste. I often use ripe bananas for natural sweetness. They add a nice flavor too. For a creamier texture, use rolled oats and almond milk. They help thicken the smoothie. You can also add a scoop of yogurt for extra creaminess. If you want to lighten it up, use less milk. Blend until smooth and creamy. You can prep your smoothie ingredients in advance. Slice your strawberries and banana the night before. Store them in an airtight container in the fridge. This saves time in the morning. You can also measure out your oats. If you want to store your smoothie, pour it into a jar. Seal it tightly and keep it in the fridge. It stays good for up to two days. Shake it well before drinking. For smoothies, a high-speed blender works best. Brands like Vitamix or Ninja are great choices. They blend fruits and oats smoothly in less time. If you use a regular blender, cut your fruits into smaller pieces first. To keep your blender in top shape, clean it right after use. Rinse it with warm water and a drop of soap. Blend it for a few seconds, then rinse again. This keeps it fresh and ready for your next smoothie adventure. For the full recipe, check out the Berrylicious Banana Oat Smoothie. {{image_2}} You can easily make this smoothie fit your needs. If you want a dairy-free option, try using almond milk or coconut milk. Both add a nice flavor and keep it creamy. Adding greens like spinach or kale boosts nutrition without changing the taste much. Just a handful can give you extra vitamins. To make your smoothie even more exciting, think about adding spices. A pinch of ginger can give it a nice kick, while nutmeg adds warmth. You can also try flavored yogurts. Using strawberry or vanilla yogurt can enhance the smoothie’s taste and creaminess. If you want a low-calorie option, skip the sweetener altogether. The fruits already offer natural sweetness. For nut-free variations, just use oat milk instead of almond milk. This keeps it safe for those with nut allergies while still tasting great. For the full recipe, check out the Berrylicious Banana Oat Smoothie 🥤. How long does the smoothie last in the fridge? A strawberry banana oat smoothie stays fresh for up to 2 days. After that, it may lose flavor and texture. What are the best containers for storage? I recommend using glass jars or airtight plastic containers. These keep the smoothie fresh and prevent spills. How can I freeze the smoothie for later? Pour the smoothie into ice cube trays or freezer-safe containers. Leave some space at the top, as liquids expand when frozen. What are the tips on defrosting? To defrost, place the smoothie in the fridge overnight. If you're in a hurry, you can use the microwave on low power. Stir well before drinking. How can I incorporate leftovers into breakfast bowls? Pour any leftover smoothie over oatmeal or granola. It adds flavor and nutrients to your meal. How can I make smoothie popsicles? Pour the leftover smoothie into popsicle molds. Freeze for a few hours, and enjoy a refreshing treat! A Strawberry Banana Oat Smoothie is a healthy choice. It packs a nutritious punch. Here’s the breakdown: - Calories: About 250-300 per serving. - Carbs: Roughly 50 grams from fruits and oats. - Fiber: About 7 grams, great for digestion. - Protein: Around 6-8 grams, depending on milk choice. - Vitamins: High in vitamin C from strawberries and potassium from bananas. The smoothie provides essential nutrients while tasting great. It fuels your body and keeps you full. Yes, you can use frozen fruits! They make your smoothie thick and cold. Here are some tips: - Choose Quality: Pick high-quality frozen fruits without added sugars. - Blend Carefully: Start slow to avoid overworking your blender. - Adjust Liquid: You may need extra milk to blend well. Frozen fruits can be just as tasty as fresh ones. They also last longer, saving you money and time. There are several ways to make your smoothie thick without losing flavor: - Add More Oats: Oats thicken the smoothie and add fiber. - Use Less Liquid: Start with less milk and add more as needed. - Use Frozen Fruits: They create a thick, creamy texture. - Add Yogurt: Greek yogurt adds creaminess and protein. Experiment with these tips. You’ll find the right balance for your taste! In this blog post, we explored how to make a delicious Strawberry Banana Oat Smoothie using fresh ingredients. We covered the main and optional ingredients, measuring tips, and step-by-step instructions for a smooth blend. I shared serving suggestions, tips for making ahead, and variations to keep things exciting. Lastly, we discussed storage options for your smooth creations. This smoothie is not just tasty; it’s also fun to personalize. Try new flavors and ingredients to make it your own. Enjoy your smoothie adventure!

Strawberry Banana Oat Smoothie Healthy and Simple Recipe

Looking for a quick and healthy boost? You’ll love this Strawberry Banana Oat Smoothie! With just four main ingredients, you

When making Easy Garlic Butter Naan, the right ingredients matter. Here’s what you need: - 2 cups all-purpose flour - 1 teaspoon instant yeast - 1 teaspoon sugar - 1 teaspoon salt - 3/4 cup warm water - 2 tablespoons plain yogurt (or Greek yogurt) - 3 tablespoons butter, melted - 4 cloves garlic, minced - Fresh cilantro, chopped (for garnish) Each ingredient plays a key role in flavor and texture. The flour gives structure, while the yeast helps it rise. Sugar feeds the yeast, making the naan fluffy. Salt adds taste, and warm water activates the yeast. Yogurt gives the naan a nice tang and softness. Butter and garlic create that rich, savory flavor we love. Finally, cilantro adds a fresh pop. Remember, the quality of your ingredients affects your naan. Fresh garlic and good butter make a big difference. For the full recipe, check out Easy Garlic Butter Naan. - First, gather your dry ingredients: 2 cups of all-purpose flour, 1 teaspoon of instant yeast, 1 teaspoon of sugar, and 1 teaspoon of salt. Mix these together in a bowl. - Next, create a well in the center of the mix. Pour in 3/4 cup of warm water and 2 tablespoons of plain yogurt. Stir everything until it becomes a sticky dough. - Now, sprinkle some flour on a clean surface. Knead the dough for about 5 to 7 minutes. It should feel smooth and elastic. This step is key for a great naan. - Take your dough and place it in a lightly oiled bowl. Cover the bowl with a damp cloth. Let it rise in a warm spot for about 1 hour. You want it to double in size. - For the best results, find a warm area. You can even turn on your oven for a bit and then turn it off before placing the dough inside. - Once the dough has risen, punch it down gently. Divide it into four equal portions. Shape each portion into a ball. Let them rest for another 15 minutes. - Preheat your skillet or tandoor on medium-high heat. - Roll each ball into an oval or round shape, about 1/4 inch thick. Brush one side with melted butter. Sprinkle minced garlic on top, pressing lightly to stick. - Cook the naan garlic-side down in your skillet. It only needs about 1-2 minutes until bubbles appear. Flip it and cook for another 1-2 minutes until golden brown. - Lastly, remove it from the skillet and brush with more melted butter. Repeat this with the rest of the dough portions. Serve warm and enjoy your Easy Garlic Butter Naan. For the complete recipe, check [Full Recipe]. To make great naan, focus on the dough. The right consistency is key. Your dough should be soft and slightly sticky but not too wet. If it sticks to your hands, add a bit more flour. Knead it well until it's smooth and elastic. This helps the naan puff up while cooking. For flavor, add more garlic or fresh herbs. You can mix in chopped cilantro, parsley, or even a pinch of cumin. This gives your naan a unique twist that will impress your friends and family. You can cook naan in a skillet or a tandoor. A skillet is easier for most home cooks. Heat the skillet to medium-high and don't rush it. A hot skillet helps the naan puff up nicely. If you have access to a tandoor, it gives a smoky flavor that is hard to beat. Watch your heat levels. If it’s too high, the naan will burn. If it’s too low, it will not cook well. Adjust the heat as needed while cooking each piece to get that perfect golden brown crust. Garlic butter naan pairs well with many dishes. Try it with curries, stews, or even soups. It soaks up all the wonderful sauces. For a nice touch, serve it warm on a wooden platter or in a lined basket. This adds a rustic vibe to your meal. Remember to garnish with fresh cilantro for a pop of color. A sprinkle of sea salt can also enhance the flavor. This simple addition makes every bite even better. For the full recipe, check out the Easy Garlic Butter Naan. {{image_2}} You can easily change the flavor of your garlic butter naan. Here are a few ideas: - Adding herbs or spices: Mix in fresh herbs like rosemary or thyme into the dough. You can also try spices like cumin or paprika for a fun twist. These small changes will give your naan a unique taste and aroma. - Cheese-stuffed naan: If you love cheese, why not stuff your naan? Simply take a portion of dough and fill it with your favorite cheese, like mozzarella or feta. Seal it well and roll it out. You’ll get a cheesy surprise with each bite! You can adapt this recipe to fit different diets. Here are some options: - Gluten-free options: Use gluten-free flour blends instead of all-purpose flour. This will help you make naan that is safe for those who cannot eat gluten. Just make sure to follow the package instructions for best results. - Vegan alternatives: To make this naan vegan, replace the yogurt with a plant-based yogurt. Use a vegan butter substitute instead of regular butter. These swaps will keep the naan tasty without any animal products. Feel free to explore these variations and adaptations. They will allow you to enjoy garlic butter naan in exciting new ways! For the full recipe, check out the Easy Garlic Butter Naan section. To keep your naan fresh, you have two main options. - Refrigeration tips: Wrap the naan in plastic wrap or aluminum foil. Place it in an airtight container. In the fridge, the naan stays good for about 3 days. - Freezing techniques: For longer storage, freeze the naan. Wrap each piece in plastic wrap. Then, place them in a freezer bag. This keeps them fresh for up to 3 months. Warming naan properly is key to keeping it tasty. Forget soggy naan. Here are some great ways to reheat it. - Best practices for warming up naan: You can use a skillet or oven. Heat a skillet over medium heat. Place the naan in the dry skillet for about 30 seconds on each side. For the oven, preheat it to 350°F (175°C) and warm the naan for 5-7 minutes. - Avoiding sogginess: If using the microwave, place a damp paper towel over the naan. Heat in short bursts, around 15 seconds at a time. This keeps the naan soft without making it wet. This way, you can enjoy your Easy Garlic Butter Naan even after cooking! Check out the Full Recipe for more details. You can make naan without yeast by using baking powder. It acts as a leavening agent. Use 1 teaspoon of baking powder for every cup of flour. This method creates a soft and fluffy naan quickly. Just mix it with the flour and follow the same steps as the yeast recipe. Yes, you can use whole wheat flour. It gives a nuttier taste and a denser texture. Naan made from whole wheat flour may be a bit thicker. You might need to add a little more water to keep the dough soft and pliable. Homemade naan lasts about 2-3 days at room temperature. Store it in an airtight container. You can also freeze naan for up to 3 months. Wrap it well in plastic wrap and foil before freezing. To reheat, just warm it in a skillet or oven. Enjoy fresh naan right away for the best taste! Making garlic butter naan is simple and fun. We covered key ingredients, dough prep, and cooking steps. I shared tips for perfect naan and suggested tasty variations. Whether you want to make it gluten-free or cheesy, there’s an option for everyone. Remember, storing naan properly will keep it fresh. Enjoy your homemade naan with great dips and meals. You’ll impress family and friends with your skills. Try it out and savor the taste!

Easy Garlic Butter Naan Flavorful and Simple Recipe

If you love warm, buttery naan, you’re in for a treat! You can make Easy Garlic Butter Naan right in

- 1 cup all-purpose flour - 2 large eggs - 1 ½ cups milk - 2 tablespoons melted butter (plus more for cooking) - 2 tablespoons sugar - 1 teaspoon vanilla extract - 1/4 teaspoon salt - 1/2 cup chocolate hazelnut spread - 1/4 cup chopped hazelnuts (toasted) - Whipped cream (for serving) - Fresh berries (for garnish) Gathering the right ingredients is key. I find that using fresh items really boosts flavor. The all-purpose flour acts as the base for our crepes. Eggs give structure and richness. Milk adds creaminess, making the batter smooth. Melted butter helps keep the crepes tender and adds a lovely flavor. Sugar brings a hint of sweetness. Vanilla extract adds warmth. A pinch of salt balances all the flavors. The star of our dish is the chocolate hazelnut spread. It’s creamy and sweet, perfect for filling. Toasted hazelnuts add crunch, while whipped cream and fresh berries make for a beautiful finish. - Calories per serving: About 300 calories - Macronutrient breakdown: 8g protein, 15g fat, 40g carbohydrates - Potential health benefits: Hazelnuts are rich in healthy fats, vitamins, and minerals. They can help support heart health and provide antioxidants. Enjoying these crepes in moderation can be a tasty treat that also offers some nutritional benefits. Using fresh ingredients not only makes the dish taste better but also adds texture and nutrition. This combination creates a delightful dish that I love to share with family and friends. If you want the full recipe, check out the Chocolate Hazelnut Crepes recipe above! To start, I whisk the dry ingredients together in a bowl. I mix 1 cup of all-purpose flour, 2 tablespoons of sugar, and 1/4 teaspoon of salt. This helps to blend everything evenly. Next, I combine the wet ingredients in another bowl. I beat 2 large eggs and add 1 ½ cups of milk, 2 tablespoons of melted butter, and 1 teaspoon of vanilla extract. I mix this well until it’s smooth. Now, I slowly add the wet mixture to the dry mix while whisking. This creates a smooth batter. I let the batter rest for about 20 minutes. Resting makes the crepes soft and tender, which is just what we want. I heat a non-stick skillet over medium heat. I lightly coat the skillet with melted butter to prevent sticking. For each crepe, I pour about 1/4 cup of batter into the skillet. I quickly tilt the pan to spread the batter into a thin layer. Cooking takes about 2-3 minutes. I wait until the edges lift and the bottom turns golden. Then, I flip the crepe and cook for another minute. I transfer each crepe to a plate and repeat this process with the remaining batter. Once the crepes are ready, I spread about 1 tablespoon of chocolate hazelnut spread on one half of a crepe. I fold the crepe in half, then fold it again to form a triangle. For added crunch, I sprinkle some chopped toasted hazelnuts on top. I love adding whipped cream and fresh berries for garnish. This makes the crepes look and taste even more delicious. You can find the full recipe with detailed steps to make these delightful crepes. Enjoy creating your own chocolate hazelnut crepes! Resting the batter is key. Letting it sit for 20 minutes helps make the crepes soft. This time allows the flour to absorb the liquid fully. It also helps reduce bubbles. Cooking temperature matters too. A medium heat works best. If the pan is too hot, the crepes may burn. If it’s too cool, they will not cook properly. Aim for a golden-brown color. Overmixing your batter can lead to tough crepes. Mix just until combined. This ensures a light texture. Flipping crepes can be tricky. Use a thin spatula for easy flipping. If you try to flip too early, the crepe may break. Wait until the edges lift before you flip. Practice makes perfect! Pair these crepes with a warm drink. Coffee or hot chocolate complement the flavors well. For a fun twist, serve with a scoop of vanilla ice cream. You can also add fresh fruits like strawberries or bananas for extra taste. Use these crepes for special occasions too. They make a great dessert for brunch or a sweet treat at dinner. For more ideas, check the Full Recipe for inspiration! {{image_2}} You can make chocolate hazelnut crepes even more fun by adding fruits. Fresh bananas or strawberries work great. Just slice them up and place them inside the crepe with the chocolate hazelnut spread. The sweet and creamy mix makes each bite enjoyable. You can also try different nuts. If you want a twist, swap out hazelnuts for almonds or pecans. They add a unique crunch and flavor. Experimenting with flavors keeps your crepes exciting! If you need gluten-free options, you can use a gluten-free flour blend. This change keeps the texture smooth. It is easy and tasty, so you won't miss the regular flour. For vegan alternatives, replace eggs with flaxseed meal or applesauce. Use plant-based milk like almond or oat milk. Also, swap out the butter for coconut oil. These changes make your crepes vegan while still delicious. You don’t have to stick to just one pan type. A non-stick skillet works well, but you can also use a cast-iron skillet for a different flavor. Each pan gives a unique texture to the crepes. If you want to try baking, pour the batter into a greased baking dish. Bake at 350°F (175°C) for about 20-25 minutes. This method makes a soft and fluffy dessert. It’s a fun twist on the classic recipe. For the full recipe, refer to the Chocolate Hazelnut Crepes section. To keep leftover crepes fresh, first, let them cool completely. This helps prevent moisture buildup. Once cooled, stack the crepes with a piece of parchment paper between each. Place the stack in an airtight container. Store in the fridge for up to three days. If you want to save them longer, freeze the crepes. Wrap each crepe in plastic wrap. Then, place the wrapped crepes in a freezer bag. They will stay fresh for up to two months in the freezer. When you want to enjoy your crepes again, reheating them properly is key. The best way to reheat crepes is in a skillet. Heat the skillet over low heat. Place the crepe in the skillet for about one minute on each side. This warms the crepe without making it soggy. You can also use a microwave, but cover the crepe with a damp paper towel. This helps keep it moist. Avoid reheating for too long, as this can cause sogginess. Enjoy your delicious chocolate hazelnut crepes, even after storing! To make chocolate hazelnut crepes, follow these key steps: - Whisk flour, sugar, and salt in a bowl. - In another bowl, beat the eggs and mix with milk, melted butter, and vanilla. - Combine wet and dry ingredients to form a smooth batter. - Let the batter rest for 20 minutes. - Heat a skillet and add melted butter. - Pour in the batter, tilting the pan to spread it thin. - Cook until golden, then flip and cook the other side. - Spread chocolate hazelnut spread on the crepes, fold, and serve. Yes, you can use store-bought chocolate hazelnut spread. It saves time and is convenient. However, homemade spread offers fresher flavors. You can adjust the sweetness and texture to your liking. Store-bought spreads can be sweeter and thicker. If you want, you can mix in some chopped hazelnuts for added crunch. You can serve chocolate hazelnut crepes with many delicious toppings. Here are some ideas: - Whipped cream for a light touch. - Fresh berries like strawberries or raspberries for a fruity kick. - Sliced bananas for added sweetness. - A drizzle of maple syrup for extra flavor. - A sprinkle of powdered sugar for a pretty finish. These toppings make each bite a delightful treat. Enjoy experimenting with your favorites! In this article, we covered how to make delicious chocolate hazelnut crepes. You learned about key ingredients, from flour to fresh berries. We discussed step-by-step preparation and cooking tips to achieve the perfect crepe. I highlighted common mistakes to avoid and exciting variations for all diets. Lastly, we reviewed storage and reheating methods to keep your crepes fresh. Enjoy experimenting with flavors and making these delightful treats for any occasion. Your kitchen adventures await!

Chocolate Hazelnut Crepes Irresistible and Simple Recipe

If you crave a sweet treat that’s both easy to make and delicious, you’re in the right place! This Chocolate

To make Mediterranean stuffed peppers, gather these ingredients: - 4 large bell peppers (any color) - 1 cup quinoa, rinsed - 2 cups vegetable broth - 1 cup cherry tomatoes, halved - 1 small red onion, finely chopped - 1 can (15 oz) chickpeas, drained and rinsed - 1/2 cup Kalamata olives, pitted and chopped - 1 teaspoon dried oregano - 1 teaspoon cumin - 1/2 teaspoon garlic powder - 1/2 cup feta cheese, crumbled - 2 tablespoons olive oil - Salt and pepper to taste - Fresh parsley, chopped (for garnish) You can add more flavor with these options: - Fresh basil or mint for a refreshing taste - Zucchini or spinach for extra veggies - Red pepper flakes for a spicy kick - Lemon zest for a bright flavor - Different cheeses like goat cheese or mozzarella If you need swaps, try these ideas: - Use brown rice or couscous instead of quinoa - Swap chickpeas for black beans or lentils - Replace feta with a dairy-free cheese for vegan dishes - Use chicken or beef broth if you prefer meat flavors - Try different peppers like poblano or banana for variety These ingredients help create a tasty and filling meal, perfect for any occasion. For the complete preparation, check the Full Recipe. First, preheat your oven to 375°F (190°C). This is key for even cooking. Next, take your bell peppers. Cut the tops off and remove any seeds. I like to brush the outside of the peppers with a little olive oil. It adds flavor and helps them brown. Place the peppers upright in a baking dish. Now, let’s cook the quinoa. In a medium saucepan, bring 2 cups of vegetable broth to a boil. Add 1 cup of rinsed quinoa. Reduce the heat to low and cover the pot. Let it simmer for about 15 minutes. This allows the quinoa to soak up all the broth. When it’s done, fluff it with a fork and set it aside. Time to fill the peppers! In a large mixing bowl, combine the cooked quinoa, halved cherry tomatoes, chopped red onion, chickpeas, and olives. Add 1 teaspoon of oregano, 1 teaspoon of cumin, and ½ teaspoon of garlic powder. Mix well. Season with salt and pepper to your taste. Now, take each bell pepper and fill it with the quinoa mixture. Pack it in gently, but make sure it’s full. Sprinkle the remaining feta cheese on top of the stuffed peppers. Drizzle a little olive oil over the stuffed peppers. Cover the dish with foil to keep moisture in. Bake them for 25 minutes. After that, remove the foil and bake for another 10 to 15 minutes. This helps the peppers get tender and slightly charred. To check if they’re done, poke a pepper with a fork. It should feel soft but still hold its shape. Once done, take them out of the oven and let them cool for a few minutes. Don’t forget to garnish with fresh parsley before serving. For the full recipe, check out the earlier section! To make your peppers just right, choose large, fresh bell peppers. Wash them, then cut off the tops. Remove the seeds and ribs to create space for stuffing. Lightly brush the outside with olive oil. This helps them cook well. Bake them covered for the first half of cooking. This keeps them moist. Remove the foil to let them brown slightly. This gives a nice flavor and look. Mediterranean stuffed peppers pair well with a fresh salad. A simple green salad with lemon dressing works great. You can also serve a side of tzatziki sauce. This cool dip complements the warm peppers. For a heartier meal, add some crusty bread. It soaks up all the tasty juices from the peppers. Make your dish pop with garnishes. Sprinkle fresh parsley on top for a bright color. You can also add extra feta cheese for richness. Serve the peppers on a colorful plate. This makes the meal inviting. Try using a drizzle of olive oil around the plate for a fancy touch. These small details enhance the visual appeal and make your meal look gourmet. For the full recipe, check out the complete instructions. {{image_2}} You can switch up the protein in your Mediterranean stuffed peppers. Ground turkey or beef adds a hearty flavor. For a lighter option, try shredded chicken. If you prefer plant-based proteins, chickpeas work great. They give a nice texture and flavor. You can also mix in lentils for added protein and fiber. Just remember to adjust cooking times if you use raw meat. To make the dish vegan, swap out the feta cheese for a plant-based option. Nutritional yeast can add a cheesy flavor without dairy. Use vegetable broth instead of chicken broth to keep it vegan. You can also add more veggies like spinach or zucchini for extra nutrients. These swaps keep the flavor rich and satisfying without any animal products. Adding different herbs and spices can create unique flavors in your stuffed peppers. Try basil or thyme for a fresh twist. A dash of smoked paprika can add a nice kick. For a Mediterranean flair, mix in some za'atar spice blend. You can also add a squeeze of lemon juice for brightness. Experiment with your favorite flavors to make each batch special. To keep your Mediterranean stuffed peppers fresh, store them in airtight containers. If you're using the fridge, eat them within three to four days. For longer storage, freeze them. Wrap the peppers in plastic wrap or place them in freezer-safe bags. They can last up to three months in the freezer. To reheat stuffed peppers, the oven works best. Preheat your oven to 350°F (175°C). Place the peppers in a baking dish and cover with foil. Heat for about 20 minutes or until warm throughout. You can also use the microwave for quick reheating. Just cover them with a damp paper towel and heat for about 2-3 minutes. When stored properly, stuffed peppers last about four days in the fridge and up to three months in the freezer. Make sure to check for any signs of spoilage before eating. If you notice any odd smells or mold, it's best to toss them. Yes, you can prepare Mediterranean stuffed peppers ahead of time. To do this, follow these steps: - Cook the quinoa and mix it with the other filling ingredients. - Stuff the peppers as directed. - Cover and store them in the fridge for up to 24 hours. When you're ready to cook, simply bake them straight from the fridge. This method keeps the peppers fresh and tasty. Mediterranean stuffed peppers pair well with many sides and drinks. Here are some ideas: - A fresh green salad with lemon vinaigrette. - Grilled vegetables for a colorful plate. - Pita bread to scoop up flavors. - A glass of crisp white wine, like Sauvignon Blanc. These options enhance the meal and balance the flavors. Yes, Mediterranean stuffed peppers are quite healthy. They are packed with nutrients from fresh ingredients. Here are some benefits: - Bell peppers are high in vitamins A and C. - Quinoa provides protein and fiber. - Chickpeas add more protein and healthy carbs. - Feta cheese brings calcium and flavor. Together, these ingredients create a balanced meal that supports your health. Mediterranean stuffed peppers are a great meal packed with flavor and nutrients. We covered all the key ingredients, preparation steps, and baking instructions. I shared tips to enhance texture and flavor, plus storage advice for leftovers. You can easily adapt this recipe to meet different dietary needs. No matter how you choose to serve them, these peppers are sure to impress. Enjoy creating this tasty dish and make it your own!

Mediterranean Stuffed Peppers Flavorful and Filling Meal

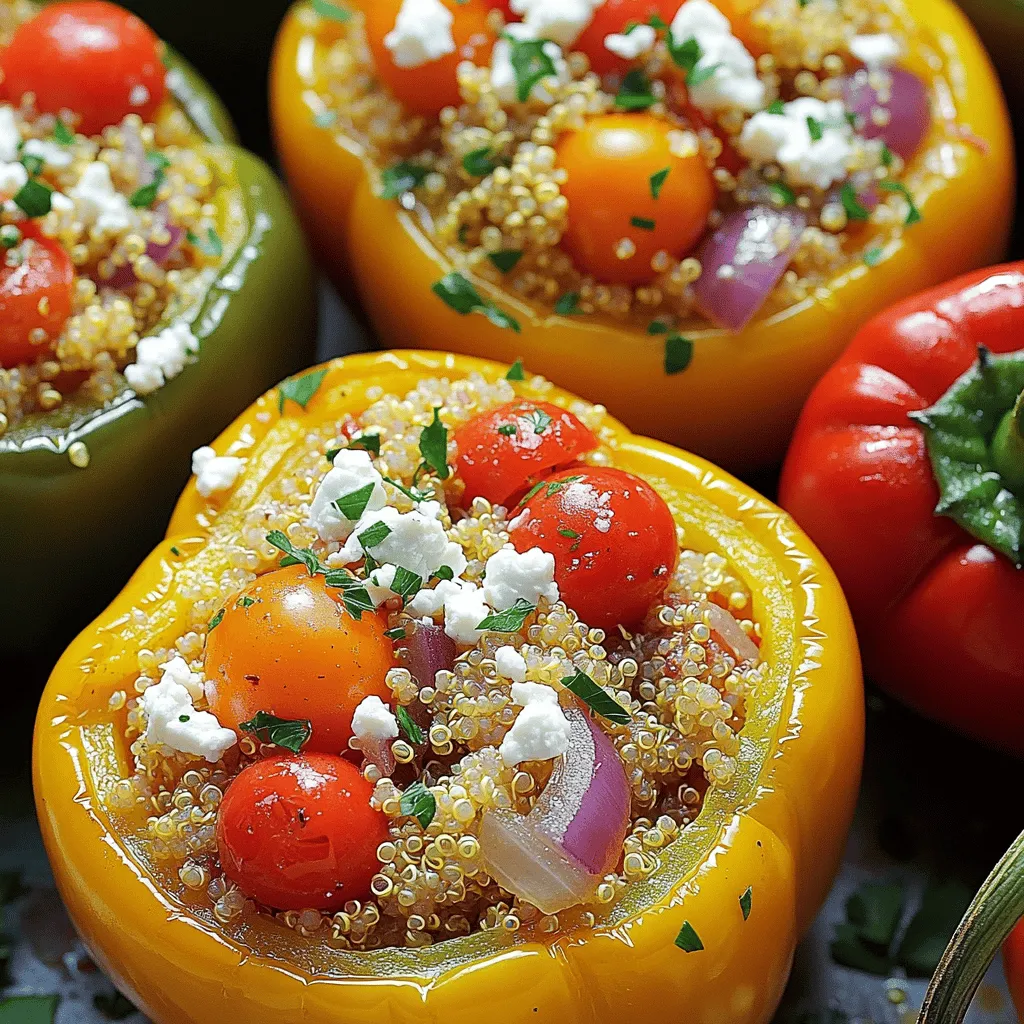
Are you ready to dive into a dish that’s both hearty and healthy? Mediterranean stuffed peppers are not only colorful

- 1 pound large shrimp, peeled and deveined - 1 cup shredded coconut (sweetened or unsweetened based on preference) - ½ cup panko breadcrumbs - ½ teaspoon garlic powder - ½ teaspoon paprika - 1 teaspoon salt - ½ teaspoon black pepper - 2 large eggs, beaten - ½ cup all-purpose flour - Cooking spray To make air fryer coconut shrimp, you need fresh, large shrimp. Make sure they are peeled and deveined for easy eating. The shredded coconut gives a nice crunch and adds sweetness. You can choose sweetened or unsweetened based on your taste. Panko breadcrumbs are key for that light and crispy texture. They are different from regular breadcrumbs. Panko stays crisp longer, which is perfect for air frying. For flavor, we add garlic powder and paprika. Garlic powder gives a nice taste without being too strong. Paprika adds a little color and warmth. Don’t forget salt and black pepper. They help to bring out all the flavors. Next, we set up our breading station. You will need beaten eggs and all-purpose flour. The eggs help the coconut and panko stick well to the shrimp. The flour gives an extra layer of crunch. A light spray of cooking spray on top helps the shrimp get even crispier. You can find the full recipe at the end of this section if you want to dive deeper into the cooking process. First, preheat your air fryer to 400°F (200°C). This step is key to getting your shrimp crispy. It helps the shrimp cook evenly and gives them a nice crunch. Next, set up a breading station. You need three bowls for this. In one bowl, place ½ cup of all-purpose flour. In the second bowl, beat two large eggs. In the last bowl, mix 1 cup of shredded coconut, ½ cup of panko breadcrumbs, ½ teaspoon of garlic powder, ½ teaspoon of paprika, 1 teaspoon of salt, and ½ teaspoon of black pepper. This mixture adds flavor and texture. Now it’s time to coat the shrimp. Dredge each shrimp in the flour first. Then dip it into the beaten eggs. Finally, coat it with the coconut-panko mixture. Press gently to make sure it sticks well. Place the breaded shrimp in a single layer in the air fryer basket. Lightly spray the tops with cooking spray. This helps them crisp up nicely. Cook the shrimp for 8-10 minutes. Make sure to flip them halfway through. This way, they cook evenly and turn golden brown. Remove the coconut shrimp from the air fryer. Let them cool for a couple of minutes before serving. Enjoy your crispy and flavorful treat! For the full recipe, check the earlier section. To get that perfect crunch on your coconut shrimp, use cooking spray. This step is key! A light mist helps the coating brown and crisp up nicely. Without it, the shrimp might turn out soggy. Also, avoid overcrowding the basket. If you add too many shrimp at once, they won’t cook evenly. They need space to breathe and crisp up. Cook them in batches if you need to. Each shrimp deserves its moment in the air fryer! Look for visual cues to check if your shrimp are done. They should be golden brown and crispy on the outside. The shrimp will also curl into a C shape when they’re ready. If they look pale or straight, give them a little more time. Don’t rush this step! Perfectly cooked shrimp have a nice bounce and are safe to eat. For a fun presentation, serve your coconut shrimp on a large platter. Add a bowl of sweet chili sauce for dipping. It adds a nice kick and complements the shrimp well. Garnish with fresh cilantro and lime wedges. This not only looks great but also adds fresh flavors. Don’t forget to check the Full Recipe for more details on making this dish! {{image_2}} You can easily change the taste of your coconut shrimp. Here are two fun ideas: - Spicy Coconut Shrimp: Add cayenne pepper to your coconut-panko mix. This gives a nice kick to each bite. Start with 1/4 teaspoon and adjust to your heat level. - Sweet Coconut Shrimp: For a sweeter treat, mix in extra brown sugar. This will make the shrimp caramelize nicely. Just add 1-2 tablespoons to the coconut mixture. You can adapt this recipe to fit different diets: - Gluten-Free Options: If you need a gluten-free choice, use almond flour instead of all-purpose flour. It gives a nice nutty flavor and works well for breading. - Vegan Alternatives: To make this dish vegan, swap the shrimp for firm tofu. Cut the tofu into pieces and follow the same breading process. It will absorb the flavors and give you a tasty snack. Coconut shrimp pairs well with many sides. Here are some great options: - Rice: Serve it with jasmine or coconut rice for a tropical vibe. - Salad: A fresh green salad with lime vinaigrette adds a crisp contrast. - Dipping Sauces: Sweet chili sauce or mango salsa complements the shrimp perfectly. Try these variations and sides to make your dish unique. For the full recipe, check out the detailed instructions above! To store leftovers properly, let the shrimp cool first. Then, place them in an airtight container. This helps keep them fresh. Store them in the fridge for up to three days. If you want to keep them longer, consider freezing them. To reheat your coconut shrimp, the air fryer works best. Set it to 375°F (190°C). Heat for about 5 minutes. This keeps them crispy and warm. You can also use an oven. Place them on a baking sheet and cover lightly with foil. Bake at 350°F (175°C) for 10 minutes. This method also helps maintain crispiness. To freeze, first cool the shrimp completely. Arrange them in a single layer on a baking sheet. Freeze for a few hours until solid. Then, transfer them to a freezer bag. Remove as much air as possible. They can stay fresh in the freezer for up to three months. When you're ready to eat, thaw them in the fridge overnight before reheating. For the full recipe, check out the complete guide to making these tasty snacks. Cook the shrimp in the air fryer at 400°F (200°C). It takes about 8 to 10 minutes. Flip the shrimp halfway through to ensure even cooking. Look for a golden brown coat to know they are done. Yes, you can use frozen shrimp. Just remember to thaw them first. Place the shrimp in the fridge overnight or run them under cold water for a quick thaw. This helps the breading stick better. Coconut shrimp tastes great with different sauces. Try these popular options: - Sweet chili sauce - Pineapple salsa - Honey mustard - Spicy mayo Each sauce adds a fun twist to your meal. You can use regular breadcrumbs, but panko gives a better crunch. Panko is lighter and crispier. Regular breadcrumbs may make the shrimp less crunchy, so keep that in mind. Yes, you can prep ahead. Bread the shrimp and store them in the fridge for a few hours. Just cook them right before serving. This keeps them fresh and crispy. If you want to prep even more, you can freeze the breaded shrimp. Thaw and cook them when ready. Check out the Full Recipe for more details. We covered how to make crispy coconut shrimp using an air fryer. You learned the key ingredients and how to set up the breading station. We discussed tips for perfect crispiness and various flavor adaptations. The storage and reheating instructions ensure you enjoy your shrimp later. Try these ideas to make your dish special. Experiment with spices and sides to suit your taste. With these steps, you can create a tasty meal that impresses. Happy cooking!

Air Fryer Coconut Shrimp Crispy and Flavorful Treat

Dive into the delicious world of Air Fryer Coconut Shrimp! This crispy, flavorful treat is a must-try for any shrimp

Older posts
Newer posts
← Previous Page1 Page2 Page3 … Page77 Next →

dsad

© 2025 greenmealmap • Built with GeneratePress

Our Policies

  • Copyright Policy
  • Cookie Policy
  • GDPR Policy
  • Privacy Policy
  • Disclaimer
  • Terms Of Use

More Information

  • Home
  • About
  • Contact
  • Appetizers
  • Dessert
  • Dinner
  • Drinks
©2025, greenmealmap About Back To Top